Sunday, May 29, 2011

Cowboy Cookie Jar Mix

Back when I was in high school I came across my first jar mix recipe. It was for a delicious brownie mix. I have enjoyed making all kinds ever since. They make great gifts and sometimes I even keep a few on hand for myself. They look so pretty on the shelf!

The recipe I am sharing with you today is "Cowboy Cookie Mix"
For starters you are going to need a 1 quart canning jar with a lid, a funnel (if your messy like me) and a tamper. ( I think that's what that wooden thing is called in the left corner of the picture.)

List of Ingredients;
1 c. flour
1 c. oats
3/4 c. M&M's
1/2 c. packed brown sugar
1/4 c. granulated sugar
1/2 t. baking powder
1/4 t. baking soda
2 T. cocoa 
1/2 c. raisins
1/2 c. chopped nuts

If you're not a nut lover then you could substitute with chocolate chips or more M&M's.

Layer ingredients in order given packing after each addition. If you don't pack then your ingredients will not all make it in. 


Screw the lid on and there you have it! 

Now you are going to need a card with the instructions on it so the recipient will know what the heck to do with this thing.

I  printed this design from one of my Gooseberry Patch cookbooks. I can't remember which one. So many of these books have such cute tags to copy and use that I loose track!


Now you can use what ever you have to decorate the card. I used my Gooseberry Patch acrylic stamps. You can find these and other cute stuff at cookbookin.com.

Write the following inside your card.

          Cowboy Cookies           
1/2 c. butter, softened
1 egg
1 t. vanilla
1 jar cookie mix

 1. Preheat oven to 350*.
 2. Beat butter in large bowl until smooth. Beat in egg and vanilla until blended. Add cookie     mix to butter mixture; stir until well blended.
 3. Drop rounded tablespoonfuls onto cookie sheet. Bake 12-14 minutes. Remove and let cool. 
Makes 2 1/2 dozen


Next you can cut a 7 inch circle out of a scrap piece of fabric to place on the top of your jar. (this isn't necessary but it sure makes it purdy!)
Then tie it into place with a piece of raffia or a ribbon. Make sure you punch and hole in your card and string your raffia through it before you make your bow.
 To be honest the first time I ever tried these I didn't think that raisins, nuts and chocolates all together would taste very good but WOW! They were great! My kids couldn't even get enough of them.


Saturday, May 28, 2011

Gooseberry Patch Cookbook Giveaway!


It's time for a giveaway, folks!

As you all have probably seen in my previous posts, I love my Gooseberry Patch cookbooks. I am super proud of my collection and love bragging that I have darn near all of the books they offer!


Many times I find great deals on these books and buy a few extras for gifts. I think my family is getting tired of always receiving cookbooks for birthdays and holidays so here I am with a few extra copies of books I already have and cherish. 

This is where you folks come in. I have three books for you all to choose from but ya only get ONE! :)

 
The first one is "Quick & Easy Family Favorites"
320 pages of delicious and incredibly easy recipes.


Next is "Christmas Book 5".
This one has chapters on Christmas memories, cheerful crafts, goodies for giving and also many festive recipes.


Last of all is "Celebrate the Seasons"
Full of recipes, crafts and ideas for year round use.

There will be only ONE winner selected. That winner will receive the book of their choice along with a Gooseberry Patch cookie spatula!

To enter simply leave me a comment stating which book you would love to add to your collection. A winner will be randomly selected. (Please US residents only) 
You can earn a second chance by clicking the "follow" button in the right column and make sure you leave a separate comment telling me you did so.

Please leave a way for me to contact you in case you are the selected winner.

Giveaway ends Friday June 3rd at Midnight. Saturday June 4th the winner will be announced.
Good Luck!  


Wednesday, May 25, 2011

TWO Recipes!

I figured since I haven't posted anything good for a while I should double up and give ya TWO great recipes. 

This first recipe caught my eye while I was looking through my new copy of "5-Ingredient Dishes in Minutes," one of Gooseberry Patch's newest magazines. (I found mine at my local Walmart.) 

My parents recently butchered a cow and I now have 37 lbs. of hamburger just waiting to be used. This "Skinny Salsa Joes" recipe was just what I needed!

It's just perfect for a quick lunch or even a family get-together. It would just need to be doubled, tripled, heck, the skies the limit!

Here's what you need:

 1 lb. ground beef, browned and drained
8 oz. can tomato sauce
1/2 c. salsa
1 T. brown sugar, packed

That's it, folks!

 
Throw it all in a saucepan, bring to a boil, reduce heat and let it simmer 10 to 15 minutes. Serve on buns.

There is a side note stating that the longer this simmers, the better these taste. I agree and not only that but they thicken up and hold together a little better. 

Every single member of my family gobbled these up. (That's pretty rare in these parts)


I've got to admit that I got half way through my sandwich and realized I didn't take a finished product photo. I thought, "Well now what do I do?"  My super smart hubby said, "Just turn it around and take a picture of the backside!" Ain't he SmArT?!? 

Now for the dessert!

"Granny's Chocolate Cobbler"
from Gooseberry Patch's 
"Sunday Dinner at Grandma's"


Ingredients needed are:

3/4 c. butter, melted
3 c. sugar, divided
1-1/2 c. self-rising flour
1/2 c. milk
1/2 c. plus 2 T. baking cocoa, divided
2 t. vanilla extract 
2-1/2 c. boiling water


Pour melted butter in a 13 x 9 pan; set aside. I used margarine, I know, Paula Deen would be so ashamed!


In a large bowl combine 1-1/2 c. sugar, flour, milk, 2 T. cocoa and vanilla.


If you're like me, you never have self-rising flour on hand, and I'll be darned if I'm gonna make a 30 minute drive to the nearest town to get some! So, I simply make my own. For every cup of all purpose flour I add 1-1/2 t. baking powder and 1/2 t. salt. (I always use this for my beer bread and it works great!)

After mixing this all together; spoon over melted butter. 
Don't stir!

Kinda funky looking, I know. Don't let this fool you. The finished product is AWESOME!
In a small bowl, mix together remaining 1-1/2 c. sugar and 1/2 c. cocoa; sprinkle evenly over batter. Pour boiling water over batter. Again, Don't stir!


Bake at 350 degrees for 30 minutes. This will not set up completely. You will want a kinda pudding at the bottom of this. Serve warm!


We liked ours with vanilla ice cream!
Have a happy Wednesday, everybody!

Sunday, May 22, 2011

Learning something new every day


For four years I have had my Kodak Easy Share camera and I never new I could do this! Panorama is what they call this. I've heard of this before but never new I was capable of doing it myself. This camera has 22 different scenes or settings and I am sure I have only ever used about 4 of them.

I am so glad I started a blog, it has encouraged me to try new things with my camera. :)

The following photos are from before learning a little about my Kodak Easy Share. These are taken around my home. 
These are my step-dad's cows that we like to call our neighbors. They live behind our house.

These are some of our herbs the kids and I planted. Mint, Thyme, Rosemary and some Lemon Balm behind the Clematis. Ally planted sunflower seeds against the deck. Looks like we need to pull some more weeds!


This is the playhouse my daddy built many years ago. We were going to use this as a chicken coop but I couldn't stand the thought of it getting ruined. The old hog shed in the top photo is now the chicken coop.

Sorry for the boring topic today but we can't be on top of things all the time! :)
Blessings to all my readers and have a great Sunday!

Sneak Peek and 4 FREE Downloads! - Gooseberry Patch

Sneak Peek and 4 FREE Downloads! - Gooseberry Patch

Wednesday, May 18, 2011

Strawberry Bread


My mother has a huge strawberry patch and every year we have strawberries coming out of our ears! My deep freeze is plum full of frozen strawberries that I keep mainly for this recipe. 

Strawberry Bread
from Gooseberry Patch's "Mom's Favorite Recipes"
Ingredients

3 c. all-purpose flour
2 c. sugar
1 t. baking soda
1 t. salt
1 t. cinnamon
4 eggs, beaten
1-1/4 c. oil
2 10-oz. pkgs. frozen strawberries, thawed and chopped

Directions

Combine the first 5 ingredients; make a well in the center. Set aside. Mix remaining ingredients together; pour into flour well. Stir until combined; divide batter and spread into 2 greased and floured 9"x5" loaf pans. Bake at 350 degrees for one hour; cool in pans for 10 minutes. Remove loaves from pans and place on wire racks to cool. Makes 16 servings. 


Tuesday, May 17, 2011

Hot Fudge Pie with Grandma's Pie Crust

My pictures don't make this look near as tasty as it actually is!
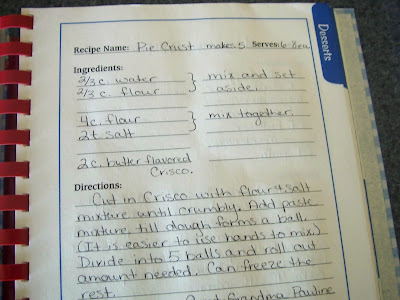
My Grandma Pauline's pie crust is the best I have ever tasted.  The convenience of store bought crust just isn't worth missing out on the flavor and flakiness. 

The ingredients for the crust are;
2/3 c. water
2/3 c. flour
another 4 c. flour
2 t. salt
2 c. butter flavored Crisco
Now this will make about 5 single pie crusts so its perfectly understandable if you wanna cut this recipe in half. I usually do. But if you are like my Grandma and bake a BUNCH of pies then go right ahead! What ever you don't use will freeze well for later use. 

 
the paste

First off you want to mix together the 2/3 c. each of flour and water. Grandma called this "the paste". Go ahead and set this to the side.

Next in a large bowl mix the salt into the 4 c. of flour. Use what ever tools you like (fork, two knives or a pastry blender) and cut in your Crisco until it resembles crumbs.
Now comes my favorite part! Pour the paste into the crumbs and mix away with your hands. :) My Grandma always let me do this part. 


The dough will start to pull away from the bowl and off of your hands. It's kinda like play-doh. Grandma would always give my brother and I some dough to play with.


The smell of this pie dough smells so much like Grandma's kitchen. I got a little sentimental at this point. My Grandma Pauline passed away this past February. Whenever I am baking she pops into my head. That woman was always baking something and was so patient with me "helping" in the kitchen as a kid. She taught me so much! 

 Ethan is helping me roll out the dough. I like to use waxed paper to do this. You can roll out in flour if you'd like. Both methods have their own benefits. I feel with the paper  the crust comes out a little flakier.
 If you are going to use this dough for a cream pie then I suggest rolling out in flour. The extra flour makes this dough a little more stiff and will hold up better in your pie plate without slipping down while baking. Yup, it's happened to me!

Ethan is now demonstrating how to place the pie dough into your pie plate with the waxed paper. He is an awesome helper!


Then just peel off the paper and ta-dah!
Cut off the excess dough with a knife and crimp your edges.

Now for the AMAZINGLY delicious filling! Courtesy of Gooseberry Patch's Sweet & Simple


Did I ever mention I LOVE me some Gooseberry Patch? If you look up above at the photos of Ethan you will see in the background my collection of Gooseberry Patch cookbooks.
Ingredients;

1/2 c. butter, melted
3 T. baking cocoa
1/4 c. flour
2 eggs, beaten
1 c. sugar
1 t. vanilla
1 c. chopped pecans (had to leave out for picky husband)

 I feel that this recipe needs to be doubled. I like my pie crust to be good and filled! My hubby likes 'em that way too!
(This is his all time favorite pie! I think he is going to get one for Father's day.)

After melting your butter, mix in the cocoa. Add the next 5 ingredients and mix well. There really isn't much work in this recipe!


You have probably noticed my eggs weren't beaten before I added them. I just hate to dirty up another dish.  So they went in straight from the shell!


Now pour your batter into your crust. Bake at 350 degrees for 30 minute. (Since I doubled my ingredients I baked for another 10-15 minutes.) Let cool and enjoy! ( We like ours still a little warm from the oven)